Laravelのmailableクラスでメール送信を行う[導入/入門編]
Laravel などの PHP フレームワークを使って WEB アプリケーションを開発していれば、その機能の中でメールを送信する必要が出てくる場合もあると思います。
Laravel では、メール送信も簡単に行えるような仕組みが提供されており、通常の Sendmail から AmazonSES や Mailgun など、様々な手段・サービスに対応し、HTML メールもテキストメールも柔軟に作成する事ができます。
今回は mailable クラスを使い、メール送信機能を実装していきたいと思います。
開発環境
今回の開発環境は以下です。
- Linux CentOS 7
- Apache 2.4
- PHP 7.2/7.1
上記環境でなくても、artisan コマンドが叩ける環境であれば同手順で進めていけます。
Laravel のバージョンについては、5.7/5.6/5.5/5.4 で動作確認済みです。
メール送信の為の提供ドライバ
Laravel のメール送信機能では、以下のドライバに対応しています。
smtpSMTP サーバーから送信する。一般的な送信方法。 sendmailPHP の mail関数で送信する。 mailgunMailgun という API ベースのメール配信サービスから送信する。 mandrillMandrill という API ベースのメール配信サービスから送信する。 sesAWS が提供するAmazon SES から送信する。 sparkpostSparkPost という API ベースのメール配信サービスから送信する。 log送信は行わず、ログファイルに内容を書き込む。 array ロジックは通りますが、送信はされません。基本的なところから配信サービスまで、幅広くカバーされているので、使うには困らないと思います。
メールドライバ(送信タイプ)設定
今回は、入門編という事で導入部分に触れますので、sendmail, および smtp で実装していきます。
ドライバの設定は laravel/config/mail.php で行います。開いて確認してみます。
<?php

return [

    /*
    |--------------------------------------------------------------------------
    | Mail Driver
    |--------------------------------------------------------------------------
    |
    | Laravel supports both SMTP and PHP's "mail" function as drivers for the
    | sending of e-mail. You may specify which one you're using throughout
    | your application here. By default, Laravel is setup for SMTP mail.
    |
    | Supported: "smtp", "sendmail", "mailgun", "mandrill", "ses",
    |            "sparkpost", "log", "array"
    |
    */

    'driver' => env('MAIL_DRIVER', 'smtp'),

    /*
    |--------------------------------------------------------------------------
    | SMTP Host Address
    |--------------------------------------------------------------------------
    |
    | Here you may provide the host address of the SMTP server used by your
    | applications. A default option is provided that is compatible with
    | the Mailgun mail service which will provide reliable deliveries.
    |
    */

    'host' => env('MAIL_HOST', 'smtp.mailgun.org'),

    /*
    |--------------------------------------------------------------------------
    | SMTP Host Port
    |--------------------------------------------------------------------------
    |
    | This is the SMTP port used by your application to deliver e-mails to
    | users of the application. Like the host we have set this value to
    | stay compatible with the Mailgun e-mail application by default.
    |
    */

    'port' => env('MAIL_PORT', 587),

    /*
    |--------------------------------------------------------------------------
    | Global "From" Address
    |--------------------------------------------------------------------------
    |
    | You may wish for all e-mails sent by your application to be sent from
    | the same address. Here, you may specify a name and address that is
    | used globally for all e-mails that are sent by your application.
    |
    */

    'from' => [
        'address' => env('MAIL_FROM_ADDRESS', 'hello@example.com'),
        'name' => env('MAIL_FROM_NAME', 'Example'),
    ],

    /*
    |--------------------------------------------------------------------------
    | E-Mail Encryption Protocol
    |--------------------------------------------------------------------------
    |
    | Here you may specify the encryption protocol that should be used when
    | the application send e-mail messages. A sensible default using the
    | transport layer security protocol should provide great security.
    |
    */

    'encryption' => env('MAIL_ENCRYPTION', 'tls'),

    /*
    |--------------------------------------------------------------------------
    | SMTP Server Username
    |--------------------------------------------------------------------------
    |
    | If your SMTP server requires a username for authentication, you should
    | set it here. This will get used to authenticate with your server on
    | connection. You may also set the "password" value below this one.
    |
    */

    'username' => env('MAIL_USERNAME'),

    'password' => env('MAIL_PASSWORD'),

    /*
    |--------------------------------------------------------------------------
    | Sendmail System Path
    |--------------------------------------------------------------------------
    |
    | When using the "sendmail" driver to send e-mails, we will need to know
    | the path to where Sendmail lives on this server. A default path has
    | been provided here, which will work well on most of your systems.
    |
    */

    'sendmail' => '/usr/sbin/sendmail -bs',

    /*
    |--------------------------------------------------------------------------
    | Markdown Mail Settings
    |--------------------------------------------------------------------------
    |
    | If you are using Markdown based email rendering, you may configure your
    | theme and component paths here, allowing you to customize the design
    | of the emails. Or, you may simply stick with the Laravel defaults!
    |
    */

    'markdown' => [
        'theme' => 'default',

        'paths' => [
            resource_path('views/vendor/mail'),
        ],
    ],
];
この中の一番最初、以下の部分で、メールドライバを設定しています。
'driver' => env('MAIL_DRIVER', 'smtp'),
設定自体は.env ファイルに記述するようになっていますので、laravel/.env を確認します。
MAIL_DRIVER=smtp
Laravel では、初期設定は smtp になっています。ここを変更する事で、メールドライバが切り替わります。
From メールアドレスの設定
処理を実装する前に、From アドレスの設定を行います。 From アドレスとは、差出人メールアドレスの事です。設定は laravel/config/mail.php で行っています。
'from' => [
    'address' => env('MAIL_FROM_ADDRESS', 'hello@example.com'),
    'name' => env('MAIL_FROM_NAME', 'Example'),
],
ここで、差出人メールアドレスと、差出人名を設定できます。
ここでも、記述は.env で行っているので、laravel/.env を開いて From メールアドレスと差出人を設定します。
MAIL_FROM_ADDRESS=notif@laravel55-practice.com
MAIL_FROM_NAME=LaravelSampler
上記「MAIL_FROM_ADDRESS 」と「MAIL_FROM_NAME 」はデフォルトでは項目がないので、新たに追加しましょう。
メール Body(本文)の作成
次に、メール本文の作成を行います。
メールには普通のテキストメールと、HTML メールの2種類があります。 Laravel ではどちらも簡単に作成できるので、両方作成します。
HTML メールの作成
HTML メールはビューとして実装します。 Blade テンプレートをそのまま使えるので、簡単に作成できます。
resources/views/emails ディレクトリを作成し、その配下に sample_notification.blade.php を作成します。
<!DOCTYPE html>
<html lang="ja">
<style>
  body {
    background-color: #fffacd;
  }
  h1 {
    font-size: 16px;
    color: #ff6666;
  }
  #button {
    width: 200px;
    text-align: center;
  }
  #button a {
    padding: 10px 20px;
    display: block;
    border: 1px solid #2a88bd;
    background-color: #FFFFFF;
    color: #2a88bd;
    text-decoration: none;
    box-shadow: 2px 2px 3px #f5deb3;
  }
  #button a:hover {
    background-color: #2a88bd;
    color: #FFFFFF;
  }
</style>
<body>
<h1>
  Sample Notification!
</h1>
<p>
  A sample notification has been sent.
</p>
<p>
  {{$text}}
</p>
<p id="button">
  <a href="https://www.google.co.jp">リンクのテスト</a>
</p>
</body>
</html>
上記の例では、CSS を直接記述していますが、外部リンクでも大丈夫です。その場合は、以下のように記述します。
<!DOCTYPE html>
<html lang="ja">
<head>
  <link rel="stylesheet" href="{{{asset('/css/mail.css')}}}">
</head>
<body>
<h1>
  Sample Notification!
</h1>
<p>
  A sample notification has been sent.
</p>
<p>
  {{$text}}
</p>
<p id="button">
  <a href="https://www.google.co.jp">リンクのテスト</a>
</p>
</body>
</html>
この場合では、laravel/public/css/mail.css を作成し、そこへスタイルを記述しています。 (尚、メール送信の場合は CSS ファイルを公開する必要がないので、public ディレクトリよりも storage か resource でディレクトリへ配置するのが良いでしょう。)
平文メールの作成
こちらはスタイルの無い、通常のメールになります。
現在では HTML メールもポピュラーになりましたが、セキュリティの観点から受信をわざと平文メールに設定し、デフォルトで HTML メールを表示しない設定にしている人や、そもそも HTML メールを表示できない端末もあるので、メールを作成する際は平文も作成しておくと幅広く対応できるでしょう。
という事で、こちらも同じくビューに記述できますので、
resources/views/emails/sample_notification_plain.blade.php
を作成し、以下記述します。
Sample Notification!

A sample notification has been sent.

{{$text}}

https://www.google.co.jp
めちゃくちゃシンプルですが Blade テンプレートなので、もちろん変数も展開可能です。
mailable クラスの作成
ではここから、メール送信の処理を実装していきます。
mailable クラス生成
まずは、メール送信クラスである mailable クラスを生成します。 クラス名は「SampleNotification 」とします。
# laravel ルートディレクトリへ移動
cd /path/to/laravel

# artisan コマンドで mailable クラスを生成する
php artisan make:mail SampleNotification

# 実行結果
[demo@localhost laravel]$ php artisan make:mail SampleNotification
Mail created successfully.
mailable クラスは、laravel/app/Mail 配下に生成されます。
laravel
├ app
│  ├─ Mail
│  │   └─ SampleNotification.php
laravel/app/Mail/SampleNotification.php を確認します。
<?php

namespace App\Mail;

use Illuminate\Bus\Queueable;
use Illuminate\Mail\Mailable;
use Illuminate\Queue\SerializesModels;
use Illuminate\Contracts\Queue\ShouldQueue;

class SampleNotification extends Mailable
{
    use Queueable, SerializesModels;

    /**
     * Create a new message instance.
     *
     * @return void
     */
    public function __construct()
    {
        //
    }

    /**
     * Build the message.
     *
     * @return $this
     */
    public function build()
    {
        return $this->view('view.name');
    }
}
コンストラクタと、build() メソッドだけのシンプルな構成となっています。
mailable クラスの定義
それでは、生成した mailable クラスへ処理を記述していきます。
- laravel/app/Mail/SampleNotification.php
-
<?php

namespace App\Mail;

use Illuminate\Bus\Queueable;
use Illuminate\Mail\Mailable;
use Illuminate\Queue\SerializesModels;
use Illuminate\Contracts\Queue\ShouldQueue;

class SampleNotification extends Mailable
{
    use Queueable, SerializesModels;

    protected $title;
    protected $text;

    /**
     * Create a new message instance.
     *
     * @return void
     */
    public function __construct($name, $text)
    {
      $this->title = sprintf('%sさん、ありがとうございます。', $name);
      $this->text = $text;
    }

    /**
     * Build the message.
     *
     * @return $this
     */
    public function build()
    {
        return $this->view('emails.sample_notification')
                    ->text('emails.sample_notification_plain')
                    ->subject($this->title)
                    ->with([
                        'text' => $this->text,
                      ]);
    }
}
上から解説していきます。
protected $title;
protected $text;
メンバ変数 $title と $text を宣言しています。 title にはメールのタイトルを、 \text には差し込み用の文章を格納します。
public function __construct($name, $text)
{
  $this->title = sprintf('%sさん、ありがとうございます。', $name);
  $this->text = $text;
}
コンストラクタです。 メール処理が発動した際に、引数をとって、それぞれをメンバ変数へ格納しています。
public function build()
{
    return $this->view('emails.sample_notification')
                ->text('emails.sample_notification_plain')
                ->subject($this->title)
                ->with([
                    'text' => $this->text,
                  ]);
}
メイン処理はこの build() メソッドへ記述していきます。
- view() メソッドで HTML メールのビューをセット
- text() メソッドで平文メールのビューをセット
- subject() メソッドでメールのタイトルをセット
- with() メソッドでビューに渡す変数をセット
送信前にプレビューを行う
Laravel では、実際にメール送信を行わなくてもメール本文のプレビューを行う事が出来ます。
ただし今回の検証では、メール送信を発動させる際に引数を渡しているので、引数==NULL 時の初期データをセットしておきます。
laravel/app/Mail/SampleNotification.php のコンストラクタの引数部分を以下のように変更します。
public function __construct($name='テスト', $text='テストです。')
次にプレビューを発動させるためのルーティングを行います。
laravel/routes/web.php を開き、以下のように記述します。
// 送信メール本文のプレビュー
Route::get('sample/mailable/preview', function () {
  return new App\Mail\SampleNotification();
});
記述できたら、http://YOURDOMAIN/sample/mailable/preview にアクセスしてみます。
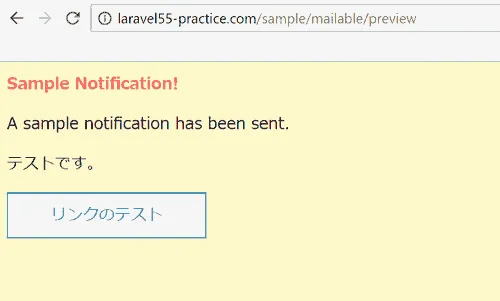
本文をプレビューできました。ここを確認しながら HTML メールの微調整を行えば、修正も早いですね。
コントローラの定義
ではいよいよメール送信処理を発動させてメールを送信します。
まずはルーティングを行います。 laravel/routes/web.php を開き、以下のように記述します。
Route::get('sample/mailable/send', 'SampleController@SampleNotification');
http://YOURDOMAIN/sample/mailable/send へのアクセス時に、SampleController の SampleNotification メソッドを実行します。
という事で、SampleController を作成し、SampleNotification メソッドを定義します。
<?php

namespace App\Http\Controllers;

use Illuminate\Http\Request;

use Illuminate\Support\Facades\Mail;
use App\Mail\SampleNotification;

class SampleController extends Controller
{
  public function SampleNotification()
  {
    name = 'ララベル太郎';
    $text = 'これからもよろしくお願いいたします。';
    $to = 'test@gmail.com';
    Mail::to($to)->send(new SampleNotification($name, $text));
  }
}
上から解説します。
use Illuminate\Support\Facades\Mail;
use App\Mail\SampleNotification;
Mail クラスと、先ほど作成した SampleNotification クラスを use します。
Mail::to($to)->send(new SampleNotification($name, $text));
Mail クラスの to() メソッドに送信先メールアドレスをセットし、send() メソッドで SampleNotification クラスのインスタンスを渡しています。
送信先をセットする際に、名前もセットしたい場合は以下のように配列で渡します。
$to = [
    [
        'name' => 'Laravel-rito',
        'email' => 'test@gmail.com'
    ]
];
もし、送信先を複数セットしたい場合は以下のようになります。
- 送信先のみ
-
$to = [
    'test_01@mail.com',
    'test_02@mail.com'
];
- 送信先に名前も付与する
-
$to = [
    [
        'name' => 'Laravel-01',
        'email' => 'test_01@mail.com'
    ],
    [
        'name' => 'Laravel-02',
        'email' => 'test_02@mail.com'
    ]
];
to に複数件の送信先をセットする場合は、10 件未満が推奨です。
ちなみに、送信先に CC や BCC をセットしたい場合は以下のようになります。
public function SampleNotification()
{
    $name = 'ララベル太郎';
    $text = 'これからもよろしくお願いいたします。';
    $to = 'test@gmail.com';
    $cc = 'cc@mail.com';
    $bcc = 'bcc@mail.com';
    Mail::to($to)
        ->cc($cc)
        ->bcc($bcc)
        ->send(new SampleNotification($name, $text));
}
CC や BCC に名前を付与したり複数セットする場合も、TO の場合と同じ書式で設定します。
メールの宛先フィールドについてはRFC2822 3.6.3. Destination address fields に準拠しています。
メール送信ドライバ設定の確認
最後になりますが、冒頭で紹介した、メールドライバの設定を一度確認してください。
「どのドライバで送信するか」
です。
PHP の mail 機能で送信する場合
送信サーバの設定が不要なので、とりあえず試してみるには一番気軽な手段です。
laravel/.env を開き、MAIL_DRIVER を sendmail に設定します。
MAIL_DRIVER=sendmail
SMTP サーバを使って送信する場合
一般的なメール送信の方法です。これを使う場合には、Laravel へ SMTP サーバの設定も済ませる必要があります。
laravel/.env を開き、MAIL_DRIVER を smtp に設定するほか、SMTP サーバ情報も設定します。
MAIL_DRIVER=smtp
MAIL_HOST=smtp.example.net
MAIL_PORT=587
MAIL_USERNAME=user.name
MAIL_PASSWORD=password
SMTP サーバ情報は各々の設定を確認してください。
動作確認
それでは実際にメールを送信して、動作確認を行います。ブラウザから http://YOURDOMAIN/sample/mailable/send へアクセスし、メール送信を実行します。
メールを送信したら、受信ボックスを確認します。
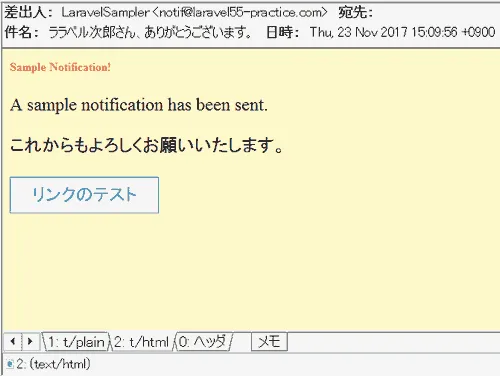
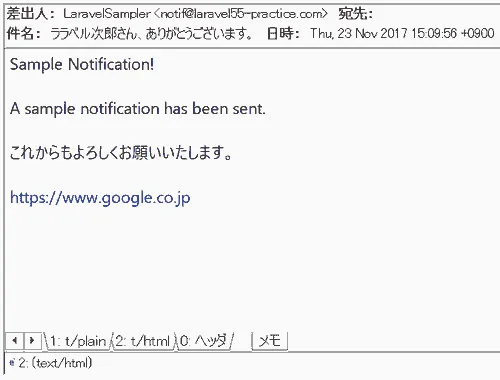
メールが送信されている事が確認できました。 さらに、平文メールも
まとめ
以上で作業は完了です。 今回は行っていませんが、送信先に cc や Bcc も設定できたり、送信処理自体をキューに入れる事も出来ます。
簡単に実装できるので、是非試してみてください。