Laravel でのメール送信を Notification クラスを利用してシンプルに実装する
Laravel では、メールや slackの通知などを行う為に Notification クラスが用意されています。
今回は Notification クラスを利用してメール送信を行います。
開発環境
今回の開発環境は以下の通りです。
- Laravel 7
ブラウザからは http://localhost で Laravel の welcome ページが表示される状態で進めていくので、ドメインは適宜置き換えてください。
メールを送信する部分があるので、受信可能なメールアドレスを用意する、もしくは MailCatcher や MailHog などの、開発用の SMTP サーバ(localhostに送信して表示してくれる)の用意が必要な部分があります。
Notification クラスと Blade テンプレートの作成
まずは通知を行うための Notification クラスと Blade テンプレートを作成します。以下の artisan コマンドを実行します。
# Notification クラスと Blade テンプレートを作成
php artisan make:notification SampleNotification --markdown=mail.sample
今回、メールは Markdown で記述するのでオプションを指定しています。(今回ここには触れないのでお好きなやつで進めてください)
artisan コマンドを実行すると、以下のファイルが作成されます。
- app/Notifications/SampleNotification.php
- resources/views/mail/sample.blade.php
app
├─ Notifications
│   └─ SampleNotification.php

resources
├─ views
       ├─ mail
      │   └─ sample.blade.php
- app/Notifications/SampleNotification.php
-
<?php

namespace App\Notifications;

use Illuminate\Bus\Queueable;
use Illuminate\Contracts\Queue\ShouldQueue;
use Illuminate\Notifications\Messages\MailMessage;
use Illuminate\Notifications\Notification;

class SampleNotification extends Notification
{
    use Queueable;

    /**
     * Create a new notification instance.
     *
     * @return void
     */
    public function __construct()
    {
        //
    }

    /**
     * Get the notification's delivery channels.
     *
     * @param  mixed  $notifiable
     * @return array
     */
    public function via($notifiable)
    {
        return ['mail'];
    }

    /**
     * Get the mail representation of the notification.
     *
     * @param  mixed  $notifiable
     * @return \Illuminate\Notifications\Messages\MailMessage
     */
    public function toMail($notifiable)
    {
        return (new MailMessage)->markdown('mail.sample');
    }

    /**
     * Get the array representation of the notification.
     *
     * @param  mixed  $notifiable
     * @return array
     */
    public function toArray($notifiable)
    {
        return [
            //
        ];
    }
}
- resources/views/mail/sample.blade.php
-
@component('mail::message')
# Introduction

The body of your message.

@component('mail::button', ['url' => ''])
Button Text
@endcomponent

Thanks,<br>
{{ config('app.name') }}
@endcomponent
Notification クラス
Notification クラスを定義します。toMail() メソッドを以下のように実装します。
- app/Notifications/SampleNotification.php
-
use App\Models\User;   // <- use しておく


public function toMail(User $user)
{
    return (new MailMessage)
        ->from(config('mail.from.address'))
        ->subject('送信テスト')
        ->markdown('mail.sample');
}
- User モデル(laravel にデフォルトで作成されている User モデルです)を use しておきます。
- このあとで、送信対象を User として送信するので、このメソッドには User が渡ってくる想定です。
- from() で渡しているのは、config から取得した From メールアドレスです。.env の MAIL_FROM_ADDRESS にメールアドレスを設定しましょう。その値が使用されます。
- キャッシュの状況次第では送信者のメールアドレスがないとエラーが出るので、その場合はキャッシュを削除します。
- markdown() でテンプレート名を渡しています。先程の artisan コマンドで生成した Blade ファイルです。ディレクトリが切られている場合は例のようにドット記法で記述できます。
- Markdown 記法ではない場合は適宜ここを置き換えてください。
コントローラ
次に、コントローラを作成します。以下の artisan コマンドを実行して、SampleController を作成します。
# Sample コントローラ作成
php artisan make:controller SampleController
artisan コマンドを実行すると、以下のファイルが作成されます。
-app/Http/Controllers/SampleController.php
app
├─ Http
│   ├─ Controllers
│   │   ├─ SampleController.php
コントローラにメールでの通知を実装します。
- app/Http/Controllers/SampleController.php
-
<?php

declare(strict_types=1);

namespace App\Http\Controllers;

use App\Models\User;
use App\Notifications\SampleNotification;

class SampleController extends Controller
{
    public function index()
    {
        // ユーザーデータを取得したつもり
        $user = new User([
            'name'  => 'Test User',
            'email' => 'test_user@example.com',
        ]);

        // 通知
        $user->notify(new SampleNotification());
    }
}
- 通知する対象のモデルから notify() を実行する事で、その対象へ(もしくはその対象に関する)通知を行う事ができます。
- 引数には、先程作成した SampleNotification をインスタンス化して渡してあげます。
なお、今回はデフォルトで存在している User モデルを使用していますが、もし別のモデルを使用する場合は、Notifiable トレイト をモデル内で use しておく必要があります。
use Illuminate\Notifications\Notifiable;

class User extends Authenticatable
{
    use Notifiable; // <- use する
ルーティング
通知を送信するためにルーティングを定義します。
- routes/web.php
-
// 追加
Route::get('/sample', 'SampleController@index');
動作確認
これで一連の流れは実装したので、ブラウザから http://localhost/sample にアクセスするか、GET でリクエストを行えばメールが送信されます。
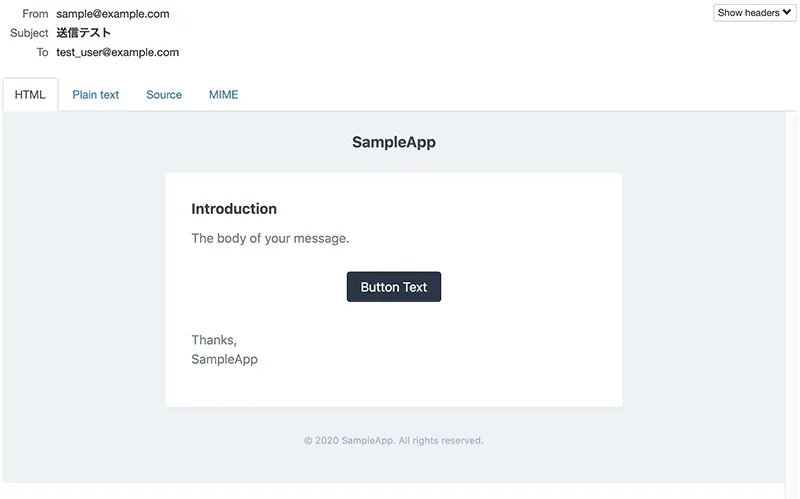
これでメールの送信を実装できました。
HTML メールのプレビュー画面を作成する
メールの本文を作成している際に、毎回メールを送信して本文の HTML 表示を確認するのは手間がかかります。
そこで、ブラウザ上で HTML メールのビューを確認できるようにします。
先ほどの通知の場合、例えばルーティングを以下のように記述します。
- routes/web.php
-
// 追加
Route::get('/preview', function () {
    // データを取得したつもり
    $user = new User([
        'name'  => 'Test User',
        'email' => 'test_user@example.com',
    ]);

    return (new \App\Notifications\SampleNotification())->toMail($user);
});
- ルーティングで Notification クラスの toMail() 結果を返してあげるとブラウザ上でメール本文 HTML のプレビューを行う事ができます。
- Notification クラスのインスタンス生成時の名前空間は use して省略できますが、一時的なプレビューなのでこのルーティングはビューが出来上がったら削除するということで直接指定しています。
http://localhost/preview へアクセスします。
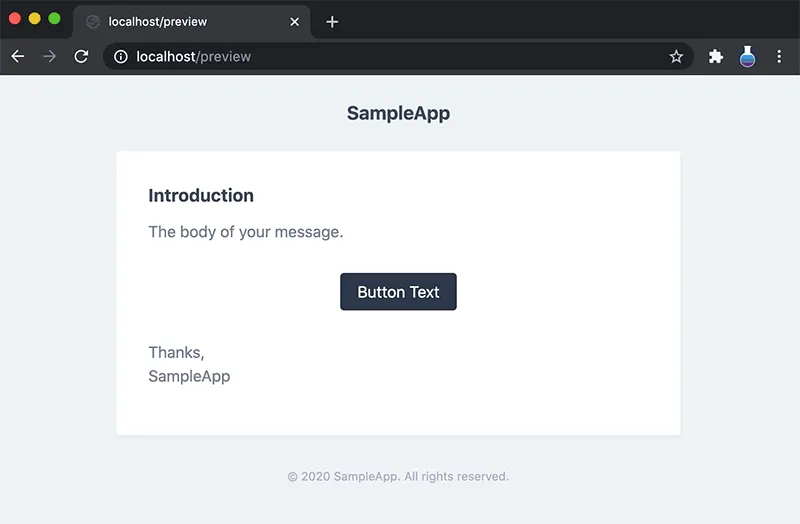
これでメールを実際に送信しなくても HTML メールのビューを確認できるようになりました。
まとめ
メールの送信に Notification クラスを用いると記述もシンプルになってとても使いやすいのでおすすめです。
ぜひ試してみてください。